OpenID Connect
The account component supports the use of OpenID Connect providers to authenticate in NS applicationsNS Application (NSApplication). A pre-built software stack that provides common enterprise application functionality such as CRUD, search, authentication, and business process modeling out of the box.. Any provider can be used, as the implementation follows the OpenID Connect standard. The applicationApplicationThe overarching model container grouping all components, domain logic, and configurations for an enterprise solution. will use the authorization code flow to authenticate the user. Only confidential clients (using client_id and client_secret) with a code grant are supported.
ApplicationApplicationInstanceTo use OpenID Connect with an applicationApplicationThe overarching model container grouping all components, domain logic, and configurations for an enterprise solution., it must be expanded with the option baseComponents.authentication.enableOIDC, which contains a comma-separated list of provider identifiers. These identifiers are matched to the configuration, but ideally are the name of the provider in camel-case.
Though it is possible to use any number of providers, it is advised to only use a single provider if possible, to avoid potential collisions of usernames or other properties. If more than one provider is required, the preferred approach is to offload integrating multiple providers to a single provider platform such as Keycloak or Auth0.
<options>
  <baseComponents.authentication.enableOIDC>google, microsoft, facebook, keycloak</baseComponents.authentication.enableOIDC>
</options>
ApplicationApplicationInstanceWhen using OpenID Connect with an applicationApplicationThe overarching model container grouping all components, domain logic, and configurations for an enterprise solution., there might not be any need to also have the internal username-password authentication systemSystemA set of interconnected components that work together to achieve a specific purpose or function. available. This option can be used to hide the login form for username and password in the login screen.
<options>
  <baseComponents.authentication.disableInternalAuth/>
</options>
Configuration
The configuration for providers is stored in the account.ns.properties files, which must be stored in the classpath (inside and/or outside of the applicationApplicationThe overarching model container grouping all components, domain logic, and configurations for an enterprise solution.) and is loaded by the AccountApplicationSettings class. Ideally configuration of providers are configured outside of the applicationApplicationThe overarching model container grouping all components, domain logic, and configurations for an enterprise solution., on the filesystem of the applicationApplicationThe overarching model container grouping all components, domain logic, and configurations for an enterprise solution. server, as the configuration contains secrets, which should not be compiled into the applicationApplicationThe overarching model container grouping all components, domain logic, and configurations for an enterprise solution. or stored in the source code repository.
The properties are structured as oidc.<providerIdentifier>.<settingName>. The providerIdentifier should match one given in the baseComponents.authentication.enableOIDC option.
oidc.google.defaultLoginTimeout=720
Settings overview
| Setting | Required | Description |
|---|---|---|
issuerUrl | X | The base URL for the provider. The OIDC configuration should be present at <issuerUrl>/.well-known/openid-configuration. |
clientId | X | The unique client identifier registered for the applicationApplicationThe overarching model container grouping all components, domain logic, and configurations for an enterprise solution. at the identity provider. |
clientSecret | X | The client secret is a secret generated by the identity provider specific to the applicationApplicationThe overarching model container grouping all components, domain logic, and configurations for an enterprise solution., which is required for an applicationApplicationThe overarching model container grouping all components, domain logic, and configurations for an enterprise solution. configured as confidential to access the identity provider. |
emailClaim2 | Used to select a custom email claim in the ID token, which should be used as the email address for an account. If not provided, the standard email claim is expected. | |
usernameClaim | Used to select a claim in the ID token, which should be used as the username for an account. Often the profile scope, which is requested by default will also contain the preferred_username claim. By default the applicationApplicationThe overarching model container grouping all components, domain logic, and configurations for an enterprise solution. will use the local part (before @) of the email address as the username, since not every provider has the preferred_username claim. | |
defaultProfile | defaultProfile or profileClaim | The default Profile element instance which should be used for the user account. This implies that the profile of the user will be managed inside of the applicationApplicationThe overarching model container grouping all components, domain logic, and configurations for an enterprise solution.. |
profileClaim | defaultProfile or profileClaim | The claim in the ID token which contains the name of the Profile element instance that should be assigned to the user account. This implies that the profile of the user is managed externally, so if it is changed in the identity provider, it will be updated the next time the user signs into the applicationApplicationThe overarching model container grouping all components, domain logic, and configurations for an enterprise solution.. |
defaultAccount | The default Account element instance which should be used for the user account. This implies that the profile of the user will be managed inside of the applicationApplicationThe overarching model container grouping all components, domain logic, and configurations for an enterprise solution.. | |
accountClaim | The claim in the ID token which contains the name of the Account element instance that should be assigned to the user account. This implies that the profile of the user is managed externally, so if it is changed in the identity provider, it will be updated the next time the user signs into the applicationApplicationThe overarching model container grouping all components, domain logic, and configurations for an enterprise solution.. | |
defaultUserGroups1 | The default list of UserGroup element instances which should be used for the user account. This implies that the userGroups of the user will be managed inside of the applicationApplicationThe overarching model container grouping all components, domain logic, and configurations for an enterprise solution.. The value can be empty if no groups should be linked, a single value for 1 userGroup or a comma-separated list of userGroups. | |
userGroupsClaim1 | The claim in the ID token which contains the name of the UserGroup element instances that should be assigned to the user account. This implies that the userGroups of the user are managed externally, so if it is changed in the identity provider, it will be updated the next time the user signs into the applicationApplicationThe overarching model container grouping all components, domain logic, and configurations for an enterprise solution.. Both String and Array[String] claims are supported. | |
defaultLoginTimeout | The default login timeout that should be assigned to a user account. | |
additionalScopes | A comma-separated list of additional scopes that should be requested to have access to all of the used claims. By default the claims openid, profile and email are requested. |
1 Introduced in net.democritus:base-components@2022.2.1.
2 Introduced in net.democritus:base-components@2024.1.6.
Setting up with an identity provider
To set up an applicationApplicationThe overarching model container grouping all components, domain logic, and configurations for an enterprise solution. with OpenID Connect, it must be registered at an identity provider. The provider will either return a client identifier, or let you choose one.
The following listing contains instructions to set up OpenID Connect for several popular identity providers:
Google Cloud Platform
This documentation will guide you through the steps to register a new applicationApplicationThe overarching model container grouping all components, domain logic, and configurations for an enterprise solution. for OIDC at GCP (Google Cloud Platform).
Registering a project
An applicationApplicationThe overarching model container grouping all components, domain logic, and configurations for an enterprise solution. must be registered in a GCP project. An overview of projects is available at this link: https://console.cloud.google.com/projectselector2/home/dashboard
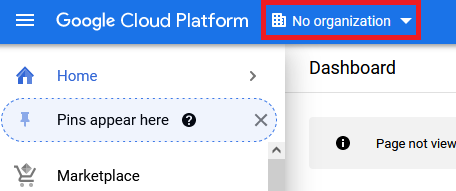
To register a new project, you can use the organization selector at the top, where you can then select the correct organization and then also create the new project if needed.
-
Click organization selector.
-
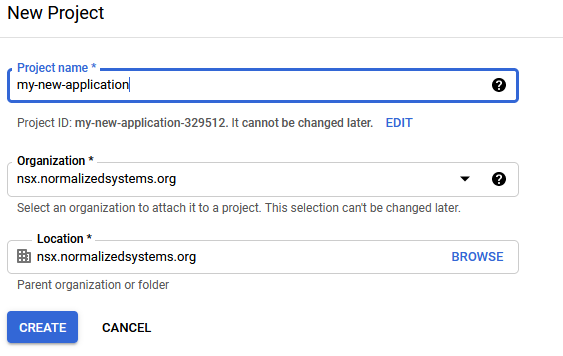
Select the correct organization on the left of the dialog that opened and then press "New Project" on the right (or select the project you want to use).

-
Choose a name for the project and press create.
-
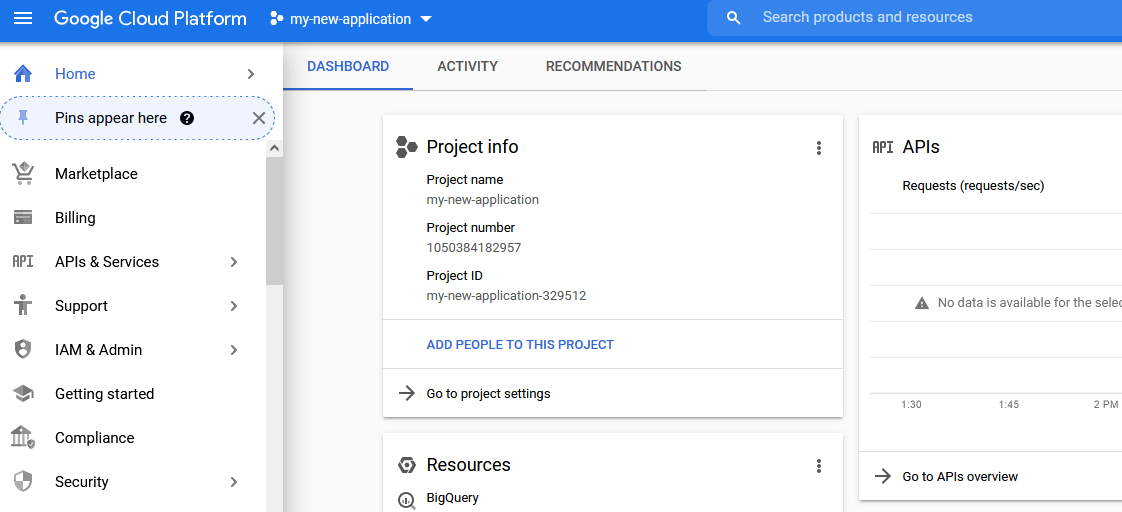
You will be redirected to the page of the project.
Set up the consent screen
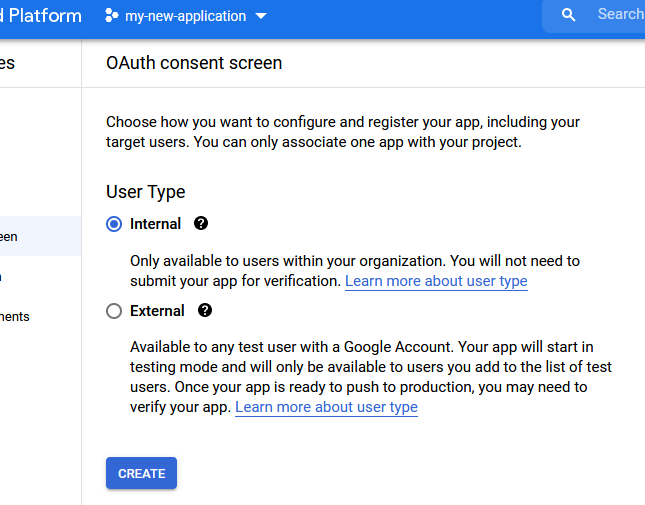
Google requires you to configure the consent screen for OAuth authentication. Authentication can be provided either for users internal to your organization or external users. If you want to have access for external users, you may need to submit the applicationApplicationThe overarching model container grouping all components, domain logic, and configurations for an enterprise solution. for verification. For most purposes, you will want to provide access to users internal to the organization only.
-
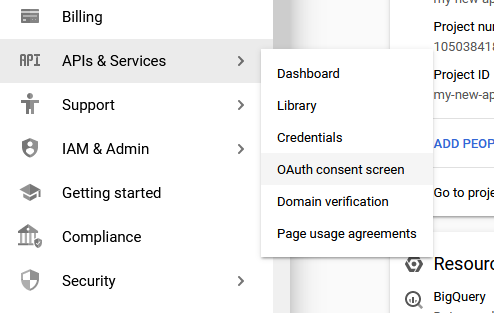
Open the consent screen. https://console.cloud.google.com/apis/credentials/consent
-
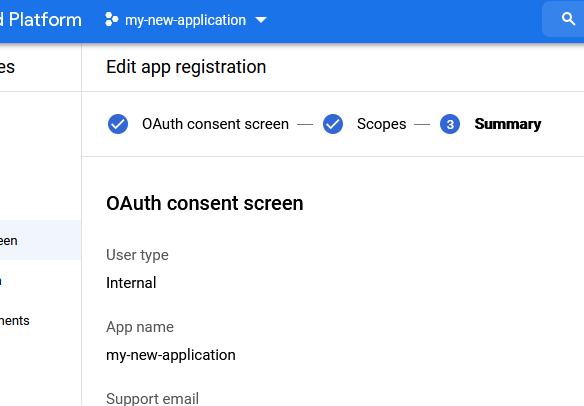
Select the user type (typically internal) and press create.
-
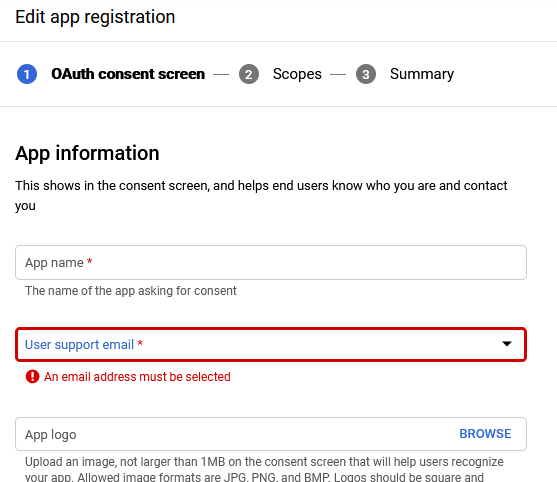
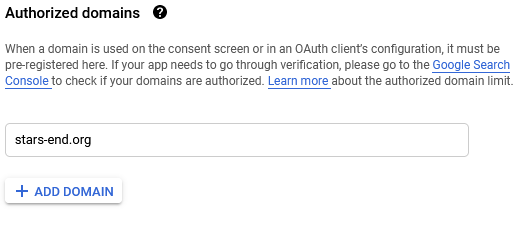
Fill out the details for the applicationApplicationThe overarching model container grouping all components, domain logic, and configurations for an enterprise solution. on the next page. Choose a name for your applicationApplicationThe overarching model container grouping all components, domain logic, and configurations for an enterprise solution. and select an email address for the developer and support contacts for the applicationApplicationThe overarching model container grouping all components, domain logic, and configurations for an enterprise solution.. You can also register one or more domains where the applicationApplicationThe overarching model container grouping all components, domain logic, and configurations for an enterprise solution. will be available. Afterwards, press "save and continue".
-
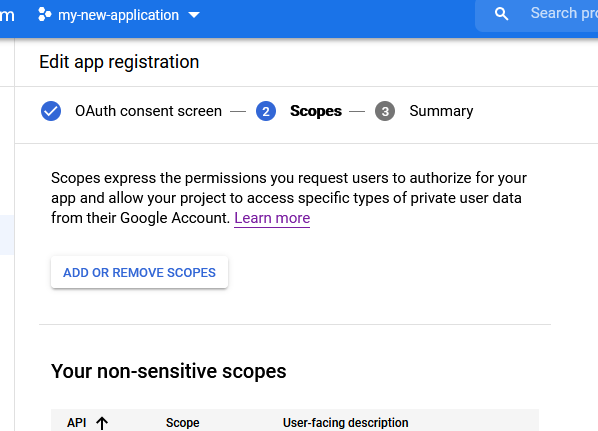
On the scopes screen, there is no need to fill out anything. The default scopes contain all information needed. Press "save and continue".
-
On the summary page, you can press "Back to dashboard".
Registering credentials
The applicationApplicationThe overarching model container grouping all components, domain logic, and configurations for an enterprise solution. for which we need OpenID Connect integration has to be registered with OAuth authentication in GCP.
-
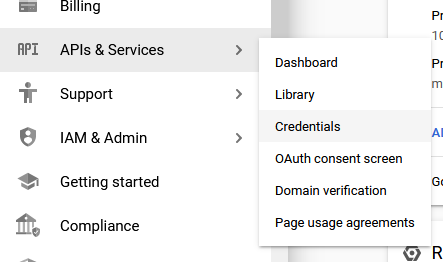
Open the credentials page. https://console.cloud.google.com/apis/credentials
-
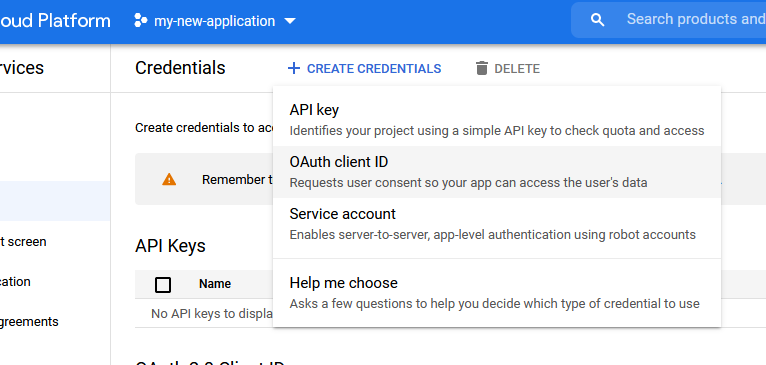
Click new credentials and select "OAuth client ID".
-
On the next screen, select the applicationApplicationThe overarching model container grouping all components, domain logic, and configurations for an enterprise solution. type "Web applicationApplicationThe overarching model container grouping all components, domain logic, and configurations for an enterprise solution." and enter a name for the applicationApplicationThe overarching model container grouping all components, domain logic, and configurations for an enterprise solution.. You should then add one or more origin URLs for the OIDC requests, which is the protocol + host (+ port if needed) where your applicationApplicationThe overarching model container grouping all components, domain logic, and configurations for an enterprise solution. can be deployed. Next you should enter the authorized redirect URL, which is the URL that the applicationApplicationThe overarching model container grouping all components, domain logic, and configurations for an enterprise solution. will request google to redirect to. This is the
/<applicationInstance.name>/openid-connectpage of the applicationApplicationThe overarching model container grouping all components, domain logic, and configurations for an enterprise solution. and it should be listed for every domain/host where your applicationApplicationThe overarching model container grouping all components, domain logic, and configurations for an enterprise solution. could be running from. Next press create.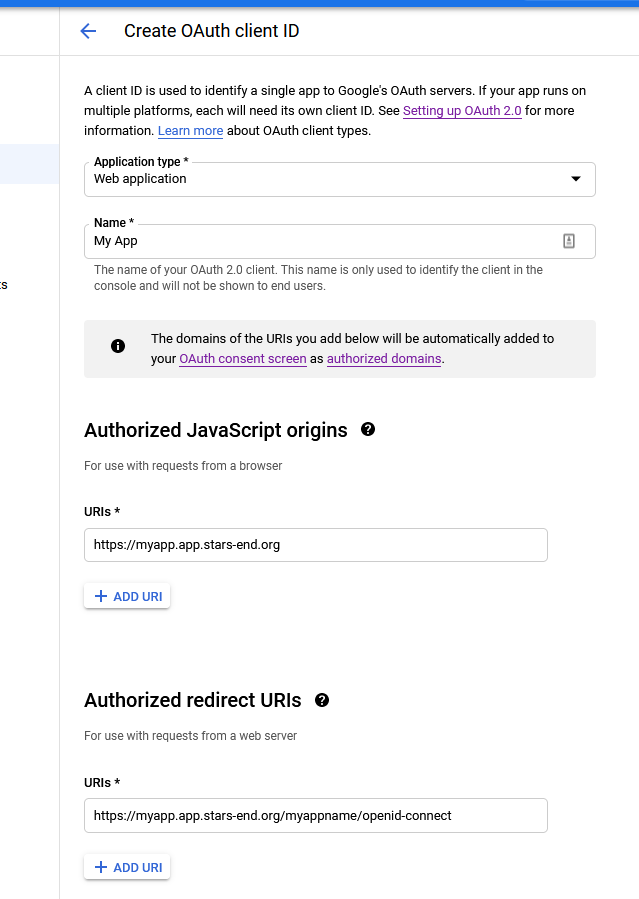
-
You will get a dialog with the
clientIdandclientSecretvalues you need to configure the OpenID Connect configuration in the applicationApplicationThe overarching model container grouping all components, domain logic, and configurations for an enterprise solution..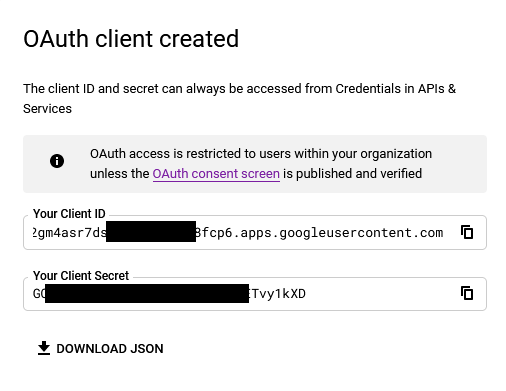
Configuring the application
To configure the applicationApplicationThe overarching model container grouping all components, domain logic, and configurations for an enterprise solution. to work with OpenID Connect via GCP, you will need to add the following properties to an account.ns.properties file in the classpath:
oidc.google.issuerUrl=https://accounts.google.com
oidc.google.clientId=yourClientIdHere
oidc.google.clientSecret=yourClientSecretHere
oidc.google.defaultProfile=user
oidc.google.defaultLoginTimeout=720
These properties assume that you have used google as the name for an OIDC provider in the baseComponents.authentication.enableOIDC option.
Microsoft Azure
This documentation will guide you through the steps to register a new applicationApplicationThe overarching model container grouping all components, domain logic, and configurations for an enterprise solution. for OIDC with Microsoft Azure.
Registering an application
-
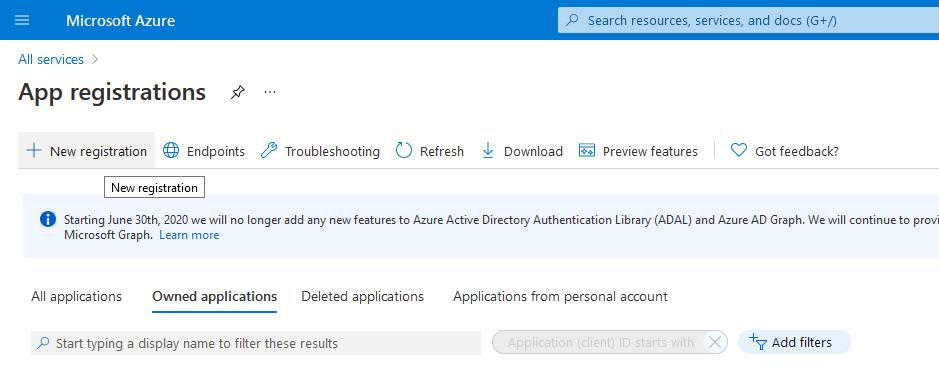
Navigate to the "App registrations" page in the Azure portal. You can also find this page with the search function in the Azure portal. Next click the "New registration" button
-
Choose a name for the applicationApplicationThe overarching model container grouping all components, domain logic, and configurations for an enterprise solution. and select an account type. You should enter a redirect URI to the
/<applicationInstance.name>/openid-connectpage of the applicationApplicationThe overarching model container grouping all components, domain logic, and configurations for an enterprise solution.. More redirect URIs can be added alte ron the "Authentication" page.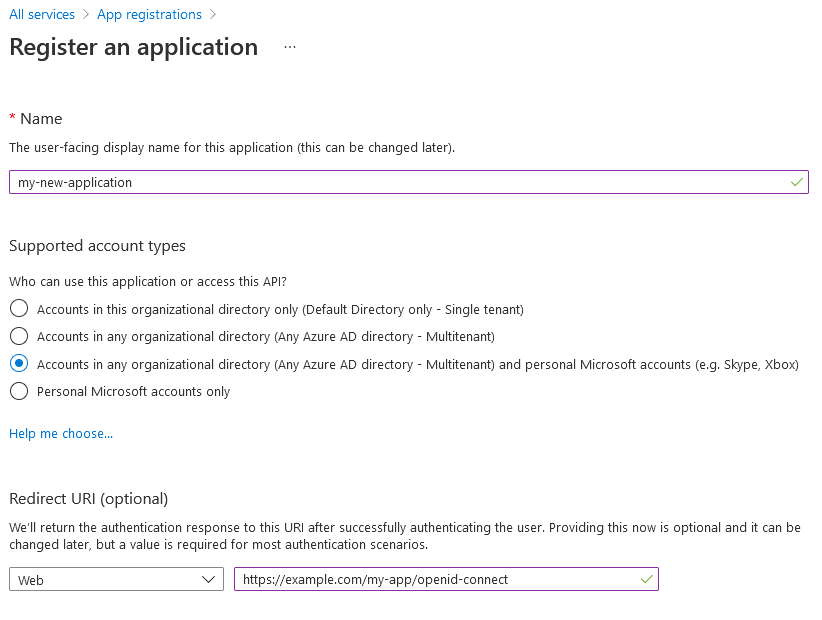
-
You will have been redirected to the settings page for the new applicationApplicationThe overarching model container grouping all components, domain logic, and configurations for an enterprise solution.. Here you can find the
clientIdand a tenant identifier.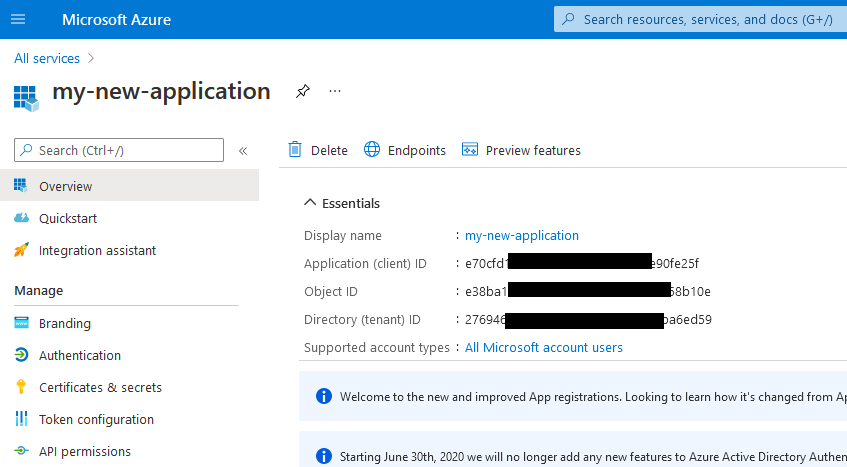
-
Open the "Certificates and secrets" page and click
New client secret.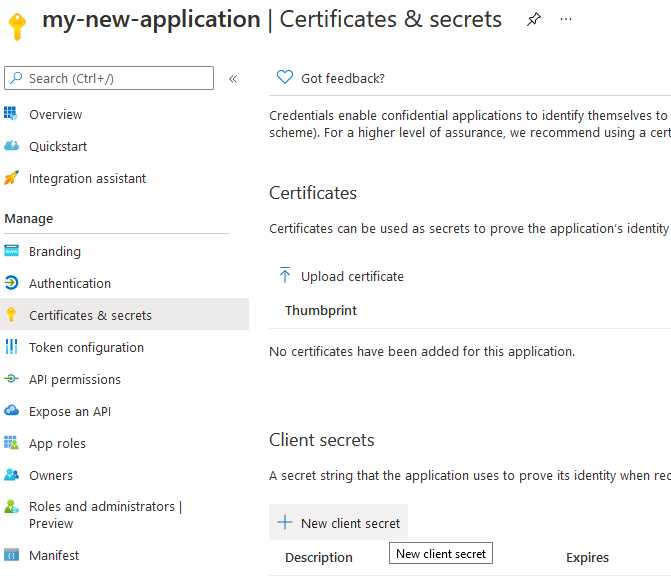
-
Select an expiry date for the secret and press "Add". The
clientSecret(Value fieldFieldA property of a DataElement expanded to a database column and user interface input element.) is now available on the "Certificates and secrets" page.
Configuring the application
To configure the applicationApplicationThe overarching model container grouping all components, domain logic, and configurations for an enterprise solution. to work with OpenID Connect via Microsoft Azure, you will need to add the following properties to an account.ns.properties file in the classpath:
oidc.microsoft.issuerUrl=https://login.microsoftonline.com/tenantHere/v2.0
oidc.microsoft.clientId=yourClientIdHere
oidc.microsoft.clientSecret=yourClientSecretHere
oidc.microsoft.defaultProfile=user
oidc.microsoft.defaultLoginTimeout=720
These properties assume that you have used microsoft as the name for an OIDC provider in the baseComponents.authentication.enableOIDC option. Microsoft follows the OpenID Connect specification for the profile scope and includes the user's username in the preferred_username claim, they use the email address for this however. We don't use this claim for the username in this example configuration so the applicationApplicationThe overarching model container grouping all components, domain logic, and configurations for an enterprise solution. uses the default local part (before @) of the email address instead.
Microsoft divides user up in categories or tenants. These are part of the base URL for the identity provider (similar to realms in Keycloak). These tenants can be common for personal and school/work accounts, organizations for school/work accounts, consumers for personal accounts or an Azure AD tenant ID.
Keycloak
This documentation will guide you through the steps to register a new applicationApplicationThe overarching model container grouping all components, domain logic, and configurations for an enterprise solution. for OIDC in Keycloak.
Setting up a new client
To register a new client, first open up the admin panel for the Keycloak realm you want to use for authentication.
-
Click the "Clients" tab and then the button "Add Client".
-
Choose a
clientIdfor your applicationApplicationThe overarching model container grouping all components, domain logic, and configurations for an enterprise solution.. Make sureopenid-connectis selected as client protocol. Next press the "Save" button.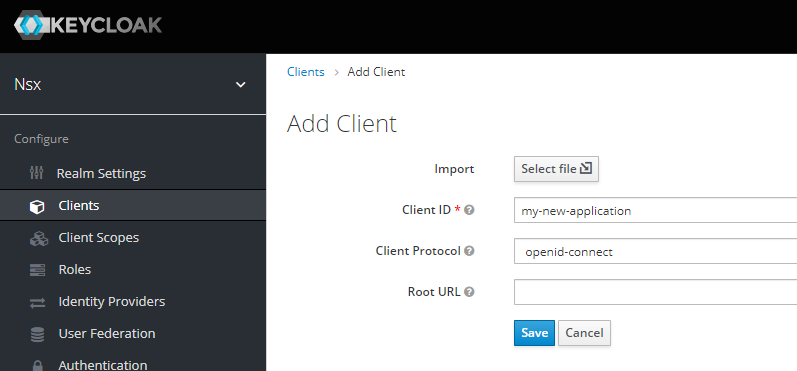
-
Keycloak now redirects to the settings page for the new client. Here the "access type" should be set to
confidential. Next you should add a "valid redirect URI", which is the URL that the applicationApplicationThe overarching model container grouping all components, domain logic, and configurations for an enterprise solution. will request Keycloak to redirect to. This is the/<applicationInstance.name>/openid-connectpage of the applicationApplicationThe overarching model container grouping all components, domain logic, and configurations for an enterprise solution. and it should be listed for every domain/host where your applicationApplicationThe overarching model container grouping all components, domain logic, and configurations for an enterprise solution. could be running from. It is good practice to also add the "Web Origins" URLs for all locations your applicationApplicationThe overarching model container grouping all components, domain logic, and configurations for an enterprise solution. could be redirecting to Keycloak from. Next press save.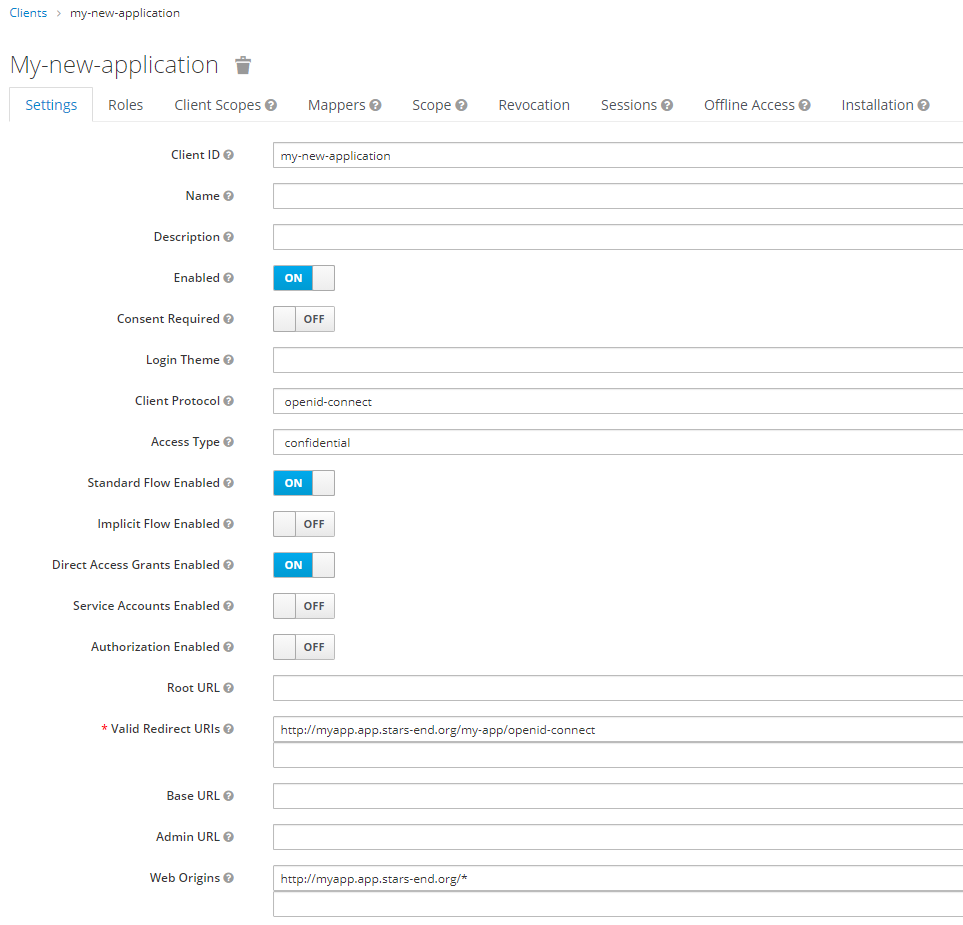
-
Now open the "credentials" tab to find the
clientSecret.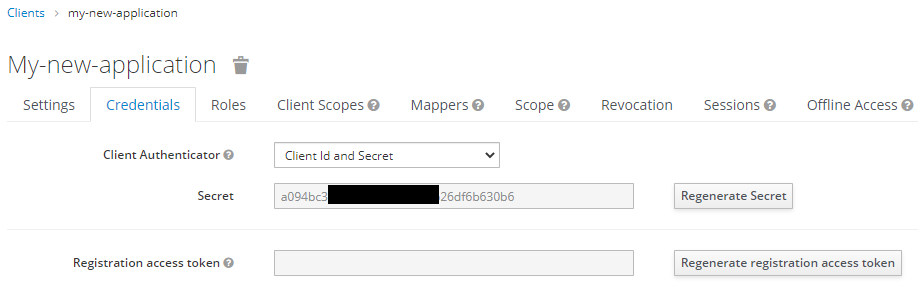
Configuring the application
To configure the applicationApplicationThe overarching model container grouping all components, domain logic, and configurations for an enterprise solution. to work with OpenID Connect via Keycloak, you will need to add the following properties to an account.ns.properties file in the classpath:
oidc.keycloak.issuerUrl=https://my.keycloak.host/auth/realms/myRealm
oidc.keycloak.clientId=yourClientIdHere
oidc.keycloak.clientSecret=yourClientSecretHere
oidc.keycloak.usernameClaim=preferred_username
oidc.keycloak.defaultProfile=user
oidc.keycloak.defaultLoginTimeout=720
These properties assume that you have used keycloak as the name for an OIDC provider in the baseComponents.authentication.enableOIDC option. Keycloak follows the OpenID Connect specification for the profile scope and includes the user's username in the preferred_username claim. We configure this so the applicationApplicationThe overarching model container grouping all components, domain logic, and configurations for an enterprise solution. uses that username instead of the default local part (before @) of the email address.
Auth0
This documentation will guide you through the steps to register a new applicationApplicationThe overarching model container grouping all components, domain logic, and configurations for an enterprise solution. for OIDC with Auth0.
Setting up a new application
To register a new applicationApplicationThe overarching model container grouping all components, domain logic, and configurations for an enterprise solution., open the Auth0 dashboard for the correct tenant.
-
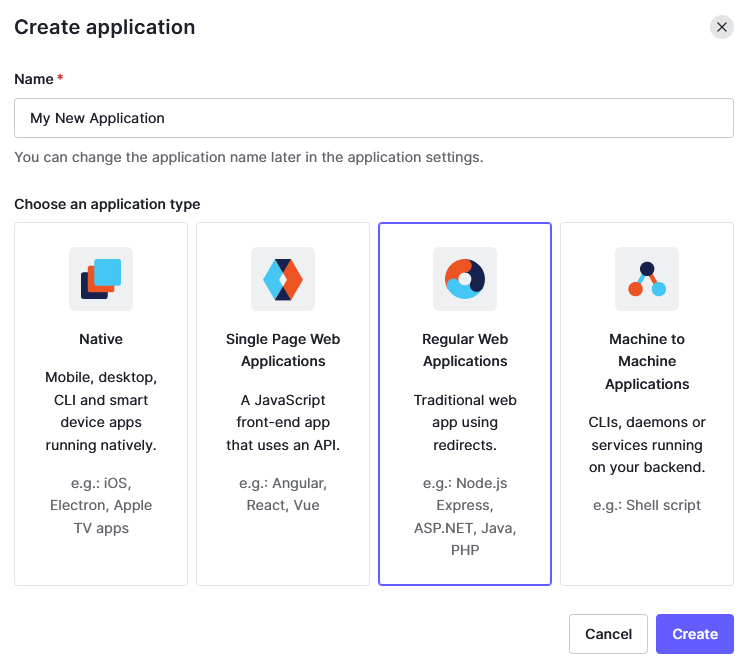
Open the "ApplicationsApplicationThe overarching model container grouping all components, domain logic, and configurations for an enterprise solution." tab and click the button "Create ApplicationApplicationThe overarching model container grouping all components, domain logic, and configurations for an enterprise solution.".

-
In the "Create applicationApplicationThe overarching model container grouping all components, domain logic, and configurations for an enterprise solution." dialog that shows, enter a name for your applicationApplicationThe overarching model container grouping all components, domain logic, and configurations for an enterprise solution. and select the type "Regular Web ApplicationsApplicationThe overarching model container grouping all components, domain logic, and configurations for an enterprise solution.". Next press the "Create" button.
-
You should have been redirected to the page for your applicationApplicationThe overarching model container grouping all components, domain logic, and configurations for an enterprise solution.. Here you will find the domain, which is also the
issuerUrlashttps://<domain>. This page also has theclientIdandclientSecret.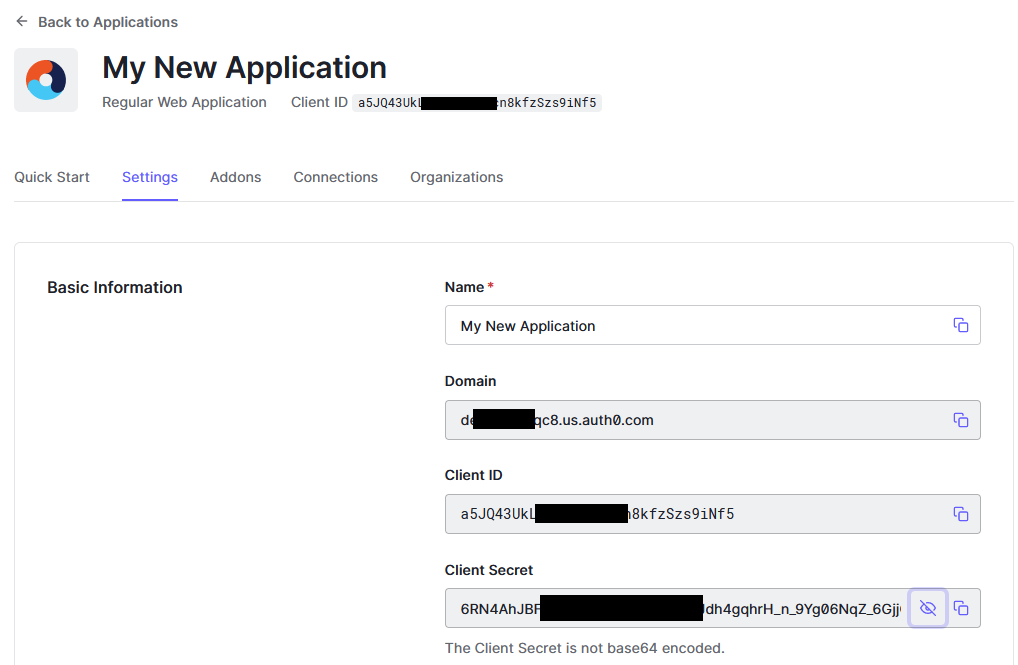
-
Scrolling down the settings page for the applicationApplicationThe overarching model container grouping all components, domain logic, and configurations for an enterprise solution., you will find the "Allowed Callback URLs" box, where you should add the URL to the
/<applicationInstance.name>/openid-connectpage of the applicationApplicationThe overarching model container grouping all components, domain logic, and configurations for an enterprise solution.. In "Allowed Web Origins" you should also add the base URL of the applicationApplicationThe overarching model container grouping all components, domain logic, and configurations for an enterprise solution., which is protocol + host (+ port if needed). Next press "Save changes".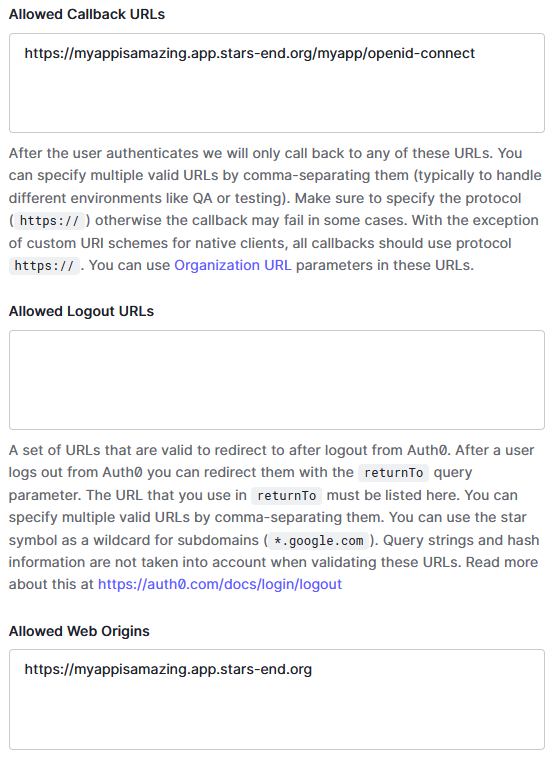
Configuring the application
To configure the applicationApplicationThe overarching model container grouping all components, domain logic, and configurations for an enterprise solution. to work with OpenID Connect via Auth0, you will need to add the following properties to an account.ns.properties file in the classpath:
oidc.auth0.issuerUrl=https://yourtenant.location.auth0.com
oidc.auth0.clientId=yourClientIdHere
oidc.auth0.clientSecret=yourClientSecretHere
oidc.auth0.defaultProfile=user
oidc.auth0.defaultTimeout=720
These properties assume that you have used auth0 as the name for an OIDC provider in the baseComponents.authentication.enableOIDC option. We don't use a claim for the username in this example configuration so the applicationApplicationThe overarching model container grouping all components, domain logic, and configurations for an enterprise solution. uses the default local part (before @) of the email address instead.
Logging in

When the user opens the login page of an OpenID Connect enabled applicationApplicationThe overarching model container grouping all components, domain logic, and configurations for an enterprise solution., they are presented with one or more buttons to log in with an external provider. Clicking one of these buttons results in the sequence below.
- Upon clicking a button, the browser is redirected to the page
/<appName>/openid-connect?provider=<providerId>.providerIdhere is the name of provider as specified in thebaseComponents.authentication.enableOIDCoption and OIDC configuration in theaccount.ns.propertiesfile. - The applicationApplicationThe overarching model container grouping all components, domain logic, and configurations for an enterprise solution. will retrieve the config from the provider based on the configured
providerUrland use this configuration to create an authentication request URL. The user's browser is then redirected to the this URL. E.g.:<issuerUrl>/protocol/openid-connect/auth?scope=openid+profile+email&response_type=code&redirect_uri=..%2F<appName>%2Fopenid-connect&state=randomValue&nonce=randomValue&client_id=<clientId>&response_mode=query - Once the user performs the login operation at the identity provider, they are redirected back to the
/<appName>/openid-connectpage. If the login failed, the user's browser will redirect back to the login page. Otherwise the applicationApplicationThe overarching model container grouping all components, domain logic, and configurations for an enterprise solution. will start the authentication process. - The applicationApplicationThe overarching model container grouping all components, domain logic, and configurations for an enterprise solution. will verify the response by checking that the returned
statevalue matches the sent value. Then it proceeds to contact the identity provider to request an ID token for the receivedcodevalue. This ID token is then verified using a cryptographic method and the originalnoncevalue which was sent to the identity provider. Once the token has been validated, the data it contains about the user is used to either create or update the account for the user in the applicationApplicationThe overarching model container grouping all components, domain logic, and configurations for an enterprise solution.. - The user is redirected to the
/<appName>/welcomepage, logged in with the account based on the OpenID Connect token.