Modeling business processes with workflows and tasks
With our data model now fully defined, we shift our focus to modeling the business logic required for the euRent systemSystemA set of interconnected components that work together to achieve a specific purpose or function., specifically the Booking Validation and Confirmation steps identified in our initial requirements.
In Normalized SystemsSystemA set of interconnected components that work together to achieve a specific purpose or function. theory, traditional business processes are translated into State Machines using Workflow and Task elements. This concept of separating concerns ensures that each atomic step in the process is clearly defined and tracked.
Integrating the process automation resource
To enable the modeling of workflows within the Micro RadiantMicro Radiant (MicroRadiant). The graphical modeling IDE and tooling environment used to design, edit, and maintain NS applications and project models., we must first integrate an additional code generation resource into our project. This is the first time in this tutorial that we will extend the base functionality of an NS applicationNS Application (NSApplication). A pre-built software stack that provides common enterprise application functionality such as CRUD, search, authentication, and business process modeling out of the box. by adding external resources. These resources, known as Expansion ResourcesExpansion Resource (ExpansionResource). A reusable resource bundle containing expanders and features that provide specific application capabilities, defined in the expansion settings and added to the classpath during expansion., allow the core NS applicationNS Application (NSApplication). A pre-built software stack that provides common enterprise application functionality such as CRUD, search, authentication, and business process modeling out of the box. model to generate corresponding code for specific architectural needs (i.e. workflow implementation).
Step 1: Navigate to expansion settings
In the left-hand menu of the Micro RadiantMicro Radiant (MicroRadiant). The graphical modeling IDE and tooling environment used to design, edit, and maintain NS applications and project models., navigate to the expansion-settings menu.
This screen lists all the resources currently used to generate your applicationApplicationThe overarching model container grouping all components, domain logic, and configurations for an enterprise solution.. By default, you will see
minimal-jee-beam, which is responsible for generating a backend applicationApplicationThe overarching model container grouping all components, domain logic, and configurations for an enterprise solution. based on Java Enterprise Edition (JEE).
Step 2: Add the process automation resource
We need the resource that provides workflow and state machine generation. This is the process-automation resource.
- Click to add a new resource.
- Select (or type) the expansion resourceExpansion Resource (ExpansionResource). A reusable resource bundle containing expanders and features that provide specific application capabilities, defined in the expansion settings and added to the classpath during expansion. named
process-automation-beam. - Choose the latest suggested version from the list.
- Confirm your selection.
Once added, a new entry, org.normalizedsystems.beam:process-automation-beam, will appear in your resources list. This
action immediately updates the Micro RadiantMicro Radiant (MicroRadiant). The graphical modeling IDE and tooling environment used to design, edit, and maintain NS applications and project models. with new functionality, specifically the option to define Workflow
and Task elements.
Step 3: Add a micro radiant plugin
After adding the Expansion ResourceExpansion Resource (ExpansionResource). A reusable resource bundle containing expanders and features that provide specific application capabilities, defined in the expansion settings and added to the classpath during expansion., we need also need to add the corresponding Micro RadiantMicro Radiant (MicroRadiant). The graphical modeling IDE and tooling environment used to design, edit, and maintain NS applications and project models. plugin. A plugin extends the Micro RadiantMicro Radiant (MicroRadiant). The graphical modeling IDE and tooling environment used to design, edit, and maintain NS applications and project models. UI with new buttons and views for that specific resource.
In our case, the workflow plugin will add buttons to create a new workflow and visualize it.import
- Navigate to the menu in the top bar of the micro radiantMicro Radiant (MicroRadiant). The graphical modeling IDE and tooling environment used to design, edit, and maintain NS applications and project models.
- Go to Settings
- Select Plugins and search for
net-democritus-workfow-pluginand validate if the plugin is already activated - If not, install the plugin and restart the Micro RadiantMicro Radiant (MicroRadiant). The graphical modeling IDE and tooling environment used to design, edit, and maintain NS applications and project models.
Step 4: Add the process automation component
A new feature might require a component in our applicationApplicationThe overarching model container grouping all components, domain logic, and configurations for an enterprise solution. to store data for its inner workings. For example, the base components we previously added, all have a separate component with their data elementsData Element (DataElement). A fundamental data concept or entity within an application's domain, acting as an anthropomorphic translation of a real-life object or concept..
Navigate to the upper left menu and select one of the base components. This will show a list of data elementsData Element (DataElement). A fundamental data concept or entity within an application's domain, acting as an anthropomorphic translation of a real-life object or concept., just like our own
rentWorkcomponent.
- In the sidebar, select
+ Component - Use
processAutomationas name of the component - Leave the other
If you know select this processAutomation component in the sidebar (click Show More), you should see the available data elementsData Element (DataElement). A fundamental data concept or entity within an application's domain, acting as an anthropomorphic translation of a real-life object or concept.. (e.g. WorkerNode, TaskJobQueue)
To use this component in our own component rentWork, we have to define a dependency.
- Select the
rentWorkcomponent in the sidebar - Select + Add new Component Dependency
- Select
processAutomationin the dependsOn dropdown
Creating the booking workflow
A Workflow in NS is a sequence of Tasks operating on a single Data ElementData Element (DataElement). A fundamental data concept or entity within an application's domain, acting as an anthropomorphic translation of a real-life object or concept. and is conceived as a State Machine. In this example, the data elementData Element (DataElement). A fundamental data concept or entity within an application's domain, acting as an anthropomorphic translation of a real-life object or concept. being considered is Booking, for which we will define a workflow.
Step 1: Add a status field
Since a workflow is fundamentally a State Machine, we first need a fieldFieldA property of a DataElement expanded to a database column and user interface input element. on the Data ElementData Element (DataElement). A fundamental data concept or entity within an application's domain, acting as an anthropomorphic translation of a real-life object or concept. to be able to store the current state. In the case of our Booking Validation process, we have to be able to indicate whether the validation process has begun, is in progress, or has been completed.
- Navigate to the Booking element.
- Create a new ValueField with the following properties:
- Name:
status - ValueField: ✅
- Type:
String - Option:
isStatusField(this option will be read and used by our workflow resource)
Step 2: Define the workflow element
With the status fieldFieldA property of a DataElement expanded to a database column and user interface input element. defined, it is now possible to create the workflow element that manages the state transitions of the Booking.
- Navigate back to the rentWork component.
- Select Add workflow from the component menu.
- Specify the required properties for the BookingFlow:
| Name | PackageName | TargetField | Execution |
|---|---|---|---|
BookingFlow | com.nsx | rentWork::Booking::status | (Leave default value) |
By setting the TargetField to rentWork::Booking::status, we configure that this workflow manages the lifecycle of
the Booking Data ElementData Element (DataElement). A fundamental data concept or entity within an application's domain, acting as an anthropomorphic translation of a real-life object or concept., and its status is stored in the status fieldFieldA property of a DataElement expanded to a database column and user interface input element.. A new entry named BookingFlow will now
be listed under the Workflows menu.
Completing the state diagram
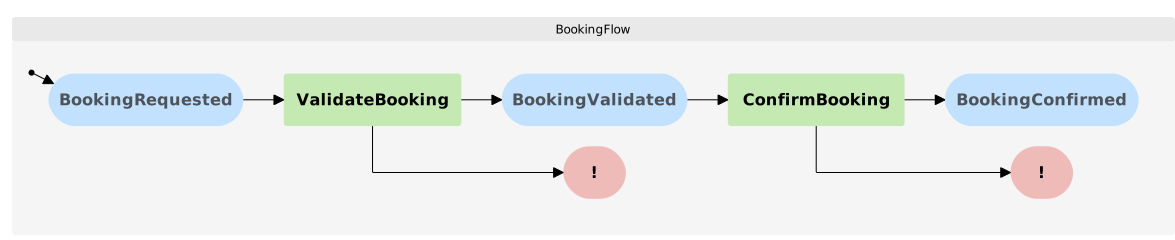
The next step is to formally define the sequence of States and Transitions for the rental process. We need three core states: a starting state, an intermediate state after validation, and a final state upon confirmation.
Step 1: Define states
Add the following three user-defined States:
- BookingRequested
- BookingValidated
- BookingConfirmed
Mark BookingRequested as the InitialState. Any new Booking created by a customer will begin in this state.
Step 2: Define transitions
A Transition defines the movement from a BeginState to an EndState via an action.
Leave ExecuteTask and EndState.TaskOutcome empty for now.
We are only modeling the flow, the actual implementation is modeled in tasks and will be added in the next section.
| Name | BeginState | EndState |
|---|---|---|
ValidateBooking | BookingRequested | BookingValidated |
ConfirmBooking | BookingValidated | BookingConfirmed |
As you create these Transitions, the Micro RadiantMicro Radiant (MicroRadiant). The graphical modeling IDE and tooling environment used to design, edit, and maintain NS applications and project models. automatically generates required intermediate states to handle systemSystemA set of interconnected components that work together to achieve a specific purpose or function. processing:
- Interim States:
ValidateBookingInProgress,ConfirmBookingInProgress. These are used to show a user that a task is currently executing. - Failure States:
ValidateBookingFailed,ConfirmBookingFailed. These are reserved for tracking failures during task execution, adhering to the NS Separation of States (SoS) principle.
Step 3: Visualizing the workflow
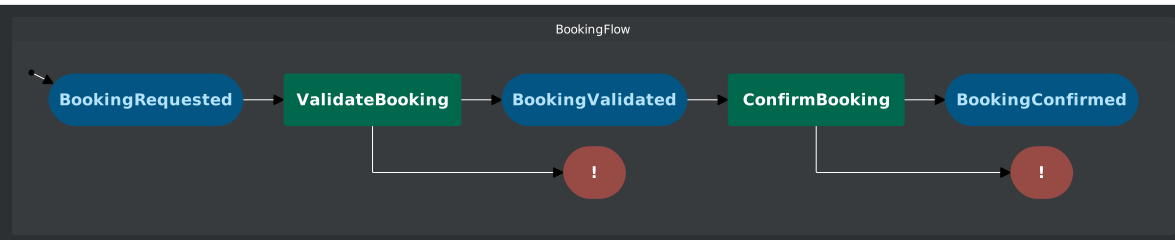
To confirm the structure, click the diagram icon on the right side of the editor and select the workflow view. You should see the full state diagram, including the automatically generated interim and failed states, clearly illustrating the flow logic.